

Appearance
Flutter Integration
Breaking Changes in version 2.0.0 - Migration Guide
With the release of version 2.0.0, several changes have been introduced that require adjustments on your side. This migration guide is designed to help you transition smoothly and understand the key changes. Click here for more information...
1. Renaming
We have standardized our terminology by migrating to the correct naming of our product. All "Bill" references have been renamed to "Receipt":
BillDto→ReceiptDto:
All subtypes of "Bill" have been removed and replaced with a unifiedReceiptDto. This means you no longer need to handle multiple types.BillProvider→ReceiptProvider:
TheReceiptProvidernow consolidates all methods previously found inBillProvider.
2. Receipt Model Changes
- The receipt model has been streamlined to include only frontend-relevant parameters.
- The
isFavouriteflag has been relocated toReceipt.Misc.isFavouritefor better categorization.
3. Receipt Method Renaming
The renaming of classes and models has also impacted the method names in the ReceiptProvider. Below are the most relevant changes:
Method Renames:
exportBillAsPDF→getReceiptPdfupdateBillComment→updateReceiptNoteupdateIsFavourite→toggleIsFavourite
Receipt Retrieval Updates:
- Methods such as
getBills,updateBills, and similar have been replaced with a new, optimized receipt retrieval process (details below).
- Methods such as
4. Receipt Retrieval Overhaul
We’ve introduced a significantly improved pagination and caching system designed to handle a larger volume of receipts efficiently.
- Refer to this Guide for implementing the new optimized receipt retrieval process.
Deprecated Documentation
If you are still using a previous version, documentation for deprecated APIs can be found here.
Support
If you encounter any issues during the migration process, don’t hesitate to reach out to us. We're here to help!
Getting Started
Resolving the SDK
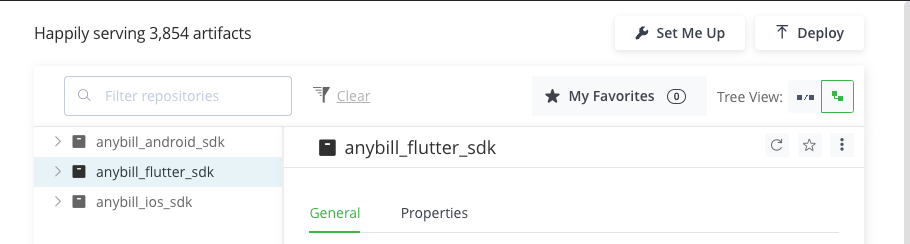
To include the anybill SDK in your Flutter project, use the dart pub token add command to add your Artifactory access token to the pub tool.
To obtain the access token login in the anybill Artifactory portal into your artifactory account using the provided credentials in the integration documents.
Using the "Set Me Up" Button in the artifact tree, the token can be generated using the included password.
bash
dart pub token add https://anybill.jfrog.io/artifactory/api/pub/anybill_flutter_sdk/- Add the desired anybill modules to your app's
pubspec.yaml.
yaml
dependencies:
  ...
  anybill_base:
    hosted:
      name: anybill_base
      url: https://anybill.jfrog.io/artifactory/api/pub/anybill_flutter_sdk
    version: ^2.0.3
  ...
TIP
anybill_base contains all base functionalities of the anybill SDK and is required by the additional modules.
Only the symbols exported by anybill_base_providers.dart, anybill_base_models.dart and anybill_base_utils.dart are part of the public API. Anything imported from package:anybill_base/src/... is an implementation detail and not supported.
Initialize the anybill SDK
The anybill SDK has to be initialized in your main:
dart
import "package:anybill_base/anybill_base_models.dart";
import "package:anybill_base/anybill_base_utils.dart";

void main() {
  AnybillSDKConfig.initialize(
    clientId: "yourClientId",
    apiEnv: ApiMode.testing,
    // Optional: custom subdomain provided by anybill
    customSubdomain: "yourSubdomain",
    // Optional if you want to use anybill AppLinks
    appLinkHandler: AnybillAppLinkHandler("your-sub-path")
  );
  runApp(
    MaterialApp(
      ....
    );
  );
}
AnybillSDKConfig.initialize() accepts the following parameters:
- clientId (required): Your anybill client id.
- apiEnv: The API environment, one of
ApiMode.production(default),ApiMode.stagingorApiMode.testing. - customSubdomain: Optional subdomain replacing the default
appin the API base URL (e.g.https://app.anybill.de,https://app.stg.anybill.de,https://app.test.anybill.de). Only set this value if anybill provided one for your integration. - appLinkHandler: Optional
AnybillAppLinkHandler, see Anybill App Link.
Initialize the anybill Logger
The anybill SDK has an integrated logging tool used to log any errors or issues occurring within the SDK itself. Initialize the Logger in your main:
dart
import "package:anybill_base/anybill_base_utils.dart";

void main() {
  AnybillLogger.init();
  runApp(
    MaterialApp(
      ....
    );
  );
}
Usage of the SDK
Error Handling
The anybill SDK uses a custom error handling model. All methods return a type of the sealed class AnybillResult including the return object on success and/or information about the error which occurred. Detailed description of the possible error codes can be found in the corresponding documentation of the methods.
dart
/// Object for displaying the results when accessing the API.
class AnybillResult<T> {

  /// Used when the result of the API has been successfully returned.
  factory AnybillResult.success(
    /// The HTTP status code as integer.
    int code, {
    /// The results' data. Can be null.
    T? data,
  }) = Success<T>;

  /// Used when the result of the API has failed while being retrieved.
  factory AnybillResult.failure({
    /// Type of the error (see [AnybillErrorType])
    required AnybillErrorType type,

    /// The HTTP status code as integer.
    int? code,

    /// Optional error message
    String? message,
  }) = Failure;
}
For Success<T> the SDK mostly differs between Http code 200 and 204, while results with code 200 include the returned object of type T in their data parameter.
Result objects of type Failure include an additional custom error type AnybillErrorType. The most common ones are going to be AnybillErrorType.genericError and AnybillErrorType.networkError with GenericError representing an error during a API Call with codes between 400 and 499 and NetworkError including all network related errors like timeouts or server errors with codes > 500.
Additionally the SDK contains custom error types:
dart
/// Enum class for the error types that can be returned from the API.
enum AnybillErrorType {
  /// This error type is used for generic errors that do not fit into any other category.
  genericError,

  /// This error type is used when there is a network error while making a request.
  networkError,

  /// This error type is used when there is an issue with refreshing the user's access token.
  invalidRefreshTokenError,

  /// This error type is used when there is an issue with the user's access token.
  invalidAccessTokenError,

  /// This error type is used when there is no user logged in.
  noUserError,

  /// This error type is used when the client ID is not set as an environment variable.
  clientIdNotAvailable,

  /// This error type is used if no continuation token was found. Either no results available or initiate query first.
  noContinuationToken,

  /// This error type is used if no payment information is available.
  noPaymentInformation,

  /// This error type is used when the issue can't be defined. Typically a critical error.
  unknown,
}
AnybillErrorType.noContinuationToken is returned by continueReceiptQuery() when no query has been initiated or no further results are available. AnybillErrorType.noPaymentInformation is returned by isCardEnrollmentAvailable() and getEnrollablePaymentInformation() when the given receipts contain no enrollable payment information.
Request retries
Every provider method that calls the anybill API accepts an optional named parameter requestCount (default 2). It defines the number of repeated requests before a Failure is returned if the call is not successful. A request is repeated after the SDK has refreshed an expired access token (HTTP 401); once the count is exhausted, a Failure of type AnybillErrorType.unknown is returned. In most cases the default value can be kept.
Example usage of the error model based on the user info method of the AuthProvider.
dart
import "package:anybill_base/anybill_base_models.dart";
import "package:anybill_base/anybill_base_providers.dart";
import "package:anybill_base/anybill_base_utils.dart";

...

Future<void> getAnybillUserInfo() async {

    final userInfoCall = await AuthProvider.instance.getUserInformation();

    if (userInfoCall is Success<UserInformationDto>) {
        // Use `userInfoCall.data`
    } else if (userInfoCall is Failure<UserInformationDto>) {
        switch (userInfoCall.type) {
            case AnybillErrorType.genericError: {
                // Display error message
            }
            case AnybillErrorType.networkError: {
                // Display error message
            }
            case AnybillErrorType.noUserError: {
                // Display error message
            }
            ...
            default: {
                // Display error message
            }
        }
    }
}Anybill App Link
The anybill SDK supports deep linking into your app from the anybill receipt website. The deep link either opens the app directly (if installed) or persists the data over an app installation. You can utilize this feature to redirect users to your app, acquire new users and add the receipt from the receipt website to an account.
To enable anybill AppLink, follow these steps:
- Acquire Applink URL provided by anybill with your unique path pattern by contacting us beforehand:
Android
xml
<intent-filter android:label="@string/app_name" android:autoVerify="true">
    <action android:name="android.intent.action.VIEW" />

    <category android:name="android.intent.category.DEFAULT" />
    <category android:name="android.intent.category.BROWSABLE" />

    <!-- Add your unique path pattern provided by anybill -->
    <data android:scheme="https" android:host="applink.anybill.de"
        android:pathPattern="/${your_path_pattern}" />
</intent-filter>
iOS
Enable the capability Associated Domains and register the domain "applinks:applink.anybill.de".
To associate your app with our website, you'll have to provide a Digital Asset Link file for Android and your iOS identifier including your iOS Developer Team ID.
- Generate Digital Asset Links file using the Android Link Assistant:
- Provide the returned file to anybill:
json
[
  {
    "relation": [
      "delegate_permission/common.handle_all_urls"
    ],
    "target": {
      "namespace": "android_app",
      "package_name": "de.anybill.ui_module_integration_example",
      "sha256_cert_fingerprints": [
        "5D:78:62:8E:4B:6A:E8:20:BE:9A:94:0B:7D:24:30:6L:79:DF:D3:8B:E7:0C:42:8B:FD:72:72:1D:36:BC:F6:C3"
      ]
    }
  }
]
WARNING
To enable anybill AppLink for your debug and release version, you'll have to generate multiple files and provide anybill both of them!
- Insert code to handle incoming app links:
In order to handle incoming deep links it is recommended to use the AnybillAppLinkHandler from our SDK.
Initialize the AnybillAppLinkHandler in the AnybillSDKConfig and pass the correct sub path name to the constructor of the class (e.g.: AnybillAppLinkHandler("sub-path-name")), to ensure that only the correct url is parsed. The handler is accessible afterwards via AnybillSDKConfig.appLinkHandler.
If the app was installed via the redirect link from our receipt website the information needed to add the receipt is persisted and you can call the checkFirstRunForAppLink() method on app start to retrieve the information in an AnybillURLData object.
!!! Note that the code is only executed if it is the first app start. !!!
If the user opens the already installed app via an app link you can use the handleAppLink(String? url) method to parse the incoming url string to an AnybillURLData object with the necessary information to add the receipt to the user account. AnybillURLData contains the following fields:
dart
class AnybillURLData {
  /// bill id extracted from the app link url
  String billId;

  /// vendor customer id extracted from the app link url
  String? vendorCustomerId;

  /// boolean flag stating whether or not a bills ID was generated by a vendors cash register system.
  bool? isSelfGenerated;
}
Both methods persist the parsed data, so the receipt can be added to the account of the currently authenticated user by calling addCachedReceipt(). To check whether an arbitrary Uri matches your configured sub path before handling it, use isAnybillAppLink(Uri? uri). If you need to parse an anybill receipt url without the handler (e.g. from a scanned QR code), AnybillURLUtils.extractAnybillURLData(String url) returns the same AnybillURLData object.
An easy way to listen for incoming app links is the app_links dart library.
E.g.:
dart
import "package:anybill_base/anybill_base_utils.dart";
import "package:app_links/app_links.dart";

...

void initAppLinkListener() {
  AnybillLogger.debug(message: "Listening to app link stream");
  AppLinks().stringLinkStream.listen(
    (link) async {
      final appLinkObj =
          await AnybillSDKConfig.appLinkHandler?.handleAppLink(link);
      if (appLinkObj?.billId != null) {
        AnybillSDKConfig.appLinkHandler?.addCachedReceipt();
      }
    },
    onError: (exception) {
      AnybillLogger.error(
        library: "AppLinkHandler",
        event: "initAppLinkListener",
        error: exception,
      );
    },
  );
}

Future<void> main() async {
  ...
  AnybillSDKConfig.appLinkHandler?.checkFirstRunForAppLink().then((receiptData) {
    if (receiptData != null) {
      AnybillSDKConfig.appLinkHandler?.addCachedReceipt();
    }
  });
  initAppLinkListener()
  runApp(YourApp());
}AnybillBase Module
Authentication
The Base module provides essential authentication functions within the anybill SDK. Most of these functions are accessible through the AuthProvider singleton, which manages user authentication and token storage.
Authentication Overview
The anybill SDK handles authentication seamlessly within its internal processes. Once a user successfully authenticates, an Access Token and a Refresh Token are securely stored in the device's local keystore:
- Access Token: Valid for 24 hours and used to authorize user requests to the anybill API.
- Refresh Token: Valid for 90 days and used to renew the Access Token upon expiration. When the Refresh Token expires, the user will need to reauthenticate.
This automated process minimizes the need for manual token handling, ensuring a smooth and secure experience for both users and developers.
Integration with Loyalty Card and Payment Card Services
For integrations involving receipt retrieval by loyalty card or payment card, you will need to create users and obtain tokens via the Partner Platform API. These tokens can then be used to initialize the anybill SDK, enabling receipt functionality tied to specific loyalty or payment card details. For detailed instructions, refer to the Partner Platform API documentation.
Authenticate User
You can authenticate a user in the SDK through two methods:
- Credentials Login: Authenticate an existing anybill user using valid credentials (email and password).
- Token-Based Login: Use token information obtained from the Partner Platform API to initialize the SDK and authenticate the user without requiring credentials.
Credentials Login
Anybill users can be logged in using the loginUser() method of the AuthProvider. It requires valid login information of a registered anybill user (email and password).
dart
    Future<void> loginUser(String email, String password) async {

        final loginCall = await AuthProvider.instance.loginUser(email: email, password: password);

        if (loginCall is Success<void>) {
            // Logged in
        } else if (loginCall is Failure<void>) {
            switch (loginCall.type) {
                case AnybillErrorType.genericError: {
                    // Display error message
                }
                case AnybillErrorType.networkError: {
                    // Display error message
                }
                ...
                default: {
                    // Display error message
                }
            }
        }
}Token-Based Login
If your App has an own user account system you can link an anybill user to your user account by using the linked token user. For detailed instructions, refer to the Partner Platform API documentation.
- Get a token from the anybill Partner API by linking you account system to an anybill id.
- Pass the received token information to the
loginUserWithToken()method of theAuthProvider.
The method accepts the following named parameters:
- accessToken (required): The access token used to authenticate to the API.
- refreshToken (required): The refresh token used to re-authenticate.
- expiresIn: Lifetime of the access token. Currently unused by the SDK.
- tokenType: Type of the access token. Defaults to
bearer.
dart
     Future<void> loginUserWithToken(String accessToken, String refreshToken, String expiresIn) async {

        final loginCall = await AuthProvider.instance.loginUserWithToken(
              accessToken: accessToken,
              refreshToken: refreshToken,
              expiresIn: expiresIn,
            );

        if (loginCall is Success<void>) {
            // Logged in
        } else if (loginCall is Failure<void>) {
            switch (loginCall.type) {
                case AnybillErrorType.genericError: {
                    // Display error message
                }
                case AnybillErrorType.networkError: {
                    // Display error message
                }
                ...
                default: {
                    // Display error message
                }
            }
        }
    }
TIP
When using the Token Based Login you'll have to check for a failing Refresh Token Call on the first anybill API Call you invoke. When the error is triggered you'll have to retrieve new authentication information from the anybill Partner Platform API.
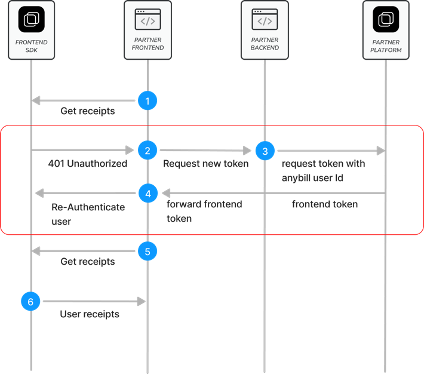
Important Note: We strongly advise against re-fetching the authentication token from our Partner Platform API on every app launch. Doing so can generate excessive network traffic, negating the performance benefits provided by the mobile SDK's token caching and session management capabilities.
Retrieve User Information
Once a user is authenticated, you can retrieve information about the anybill user using the anybill SDK. The UserInformationDto model provides the following parameters:
dart
class UserInformationDto {

   /// Unique ID of the user.
  final String id;

  /// Email address of the user.
  final String? email;

  /// Indicates if the user is anonymous.
  final bool isAnonymous;

  /// Optional external ID of the user.
  final String? externalId;

  /// Notification configuration for the user.
  final NotificationConfigurationDto? notificationConfiguration;
}
You can use the following methods to retrieve information about the user:
GetUserInformation
Retrieve the complete user model using either the API or cached user information (note that cached data may be outdated). You can enable cache usage by setting the useCache parameter to true (default false). If the cache is enabled but empty, the SDK falls back to the API.
dart
    final userInfoResult = await AuthProvider.instance.getUserInformation();

    if (userInfoResult is Success<UserInformationDto>) {
        final user = userInfoResult.data;
        /// Continue with user
    } else if (userInfoResult is Failure<UserInformationDto>) {
        switch (userInfoResult.type) {
            case AnybillErrorType.genericError: {
                // Display error message
            }
            case AnybillErrorType.networkError: {
                // Display error message
            }
            case AnybillErrorType.noUserError: {
                // Display error message
            }
            ...
            default: {
                // Display error message
            }
        }
    }
GetCachedUserInformation
Retrieve the cached user information directly from the local database without calling the API. If no user information is cached, a Failure of type AnybillErrorType.genericError with code 404 is returned.
dart
    final cachedUserInfo = await AuthProvider.instance.getCachedUserInformation();

    if (cachedUserInfo is Success<UserInformationDto>) {
        final user = cachedUserInfo.data;
        /// Continue with user
    }
GetUserQrCode
The getUserQrCode() method retrieves a UserQrCodeDto for the current authenticated user. Use this data to display a QR code which can be scanned by the POS. The returned model provides the following parameters:
dart
class UserQrCodeDto {
  /// Unique ID of the user.
  final String userId;

  /// Actions associated with the QR code.
  final List<UserQrCodeActionsDto>? actions;
}
The SDK caches the last retrieved QR code data. getCachedUserQrCode() returns this cached data without an API call; if nothing is cached, a Failure of type AnybillErrorType.genericError with code 404 is returned.
dart
    Future<void> loadUserQrCode() async {
        final qrCodeResult = await AuthProvider.instance.getUserQrCode();

        if (qrCodeResult is Success<UserQrCodeDto>) {
            final qrCode = qrCodeResult.data;
            /// Render a QR code containing `qrCode?.userId`
        } else if (qrCodeResult is Failure<UserQrCodeDto>) {
            // Display error message or fall back to
            // AuthProvider.instance.getCachedUserQrCode()
        }
}Logout and account deletion
Logging out an user deletes all of user's app data including cached receipts, authentication information and app settings (of the anybill SDK).
dart
await AuthProvider.instance.logoutUser()The deleteUser() method deletes the currently logged-in user at the anybill API and removes the local app data of the anybill SDK.
WARNING
Deletes the currently logged-in user. Do not call this method if you are creating the users in your backend.
dart
    final deleteResult = await AuthProvider.instance.deleteUser();

    if (deleteResult is Success<void>) {
        // User deleted
    } else if (deleteResult is Failure<void>) {
        // Display error message
}Receipts
The singleton ReceiptProvider.instance grants access to the anybill receipt functions. All functions of the ReceiptProvider are asynchronous and return a Future<AnybillResult<T>>, so they have to be awaited.
Retrieving receipts
The anybill SDK offers two distinct approaches for fetching user receipts:
Direct API Access: Use the
ReceiptProvider.getReceipts()method to directly access the API. This approach allows you to implement custom fetching and pagination logic based on your specific requirements.Optimized SDK Caching Process: Leverage the SDK's built-in caching and optimized pagination for efficient receipt retrieval by using the
initiateReceiptQuery()andcontinueReceiptQuery()methods in combination with an exposed observable receipt list. This approach simplifies the retrieval process and reduces the need for manual pagination handling.
Detailed information about both approaches is provided below:
Direct API Access
The getReceipts() method allows you to retrieve user receipts with pagination support. The result is a ContinuationReceiptList which includes the receipts, the total count of available receipts, and a continuation token that can be used to fetch subsequent batches:
dart
class ContinuationReceiptList {
  /// Holds the current page of the fetched receipts.
  /// The list itself is available via `receipts.data`, the number of receipts
  /// that could not be parsed via `receipts.failedDataMapCount`.
  final DataMapResult<List<ReceiptDto>> receipts;

  /// Nullable hashed String value used to continue pagination. If null, no continuation is available.
  final String? continuationToken;

  /// Total count of available items.
  final int? totalCount;
}
TIP
DataMapResult is currently not exported by the public barrel files, so you cannot reference the type by name. Access the receipts through receipts.data (a List<ReceiptDto>) and, if needed, receipts.failedDataMapCount.
You can customize the request with the following parameters:
take: Specifies the number of receipts to fetch in each batch. The default and maximum value is 100.
continuationToken: A nullable token used for paginating through the query results. If
null, a new query is initiated. To continue fetching from the previous result, use thecontinuationTokenprovided in the last response.orderBy: Specifies the field used for ordering the receipts. Currently, only
Dateis available.orderDirection: Defines the sort direction for the receipts, either
AscendingorDescending.
TIP
Important:
Due to database restrictions, you must specify the orderBy and orderDirection parameters for every page of the query.
Also, remember to reset the continuationToken if you modify any query parameters.
Example implementation in ViewModel:
dart
    String? continuationToken;
    final int _receiptBatchSize = 20;

    // Initiate query without Continuation Token
    Future<void> _getFirstPage() async {
        final initiateReceiptsReq = await ReceiptProvider.instance.getReceipts(
            take: _receiptBatchSize,
            orderBy: UserReceiptOrderByFieldDto.Date,
            orderDirection: OrderByDirectionDto.Descending);

        if (initiateReceiptsReq is Success<ContinuationReceiptList>) {
            continuationToken = initiateReceiptsReq.data?.continuationToken;

            /// Access receipts via initiateReceiptsReq.data?.receipts.data
            final List<ReceiptDto> receipts =
                initiateReceiptsReq.data?.receipts.data ?? [];
        }

        if (initiateReceiptsReq is Failure<ContinuationReceiptList>) {
            switch (initiateReceiptsReq.type) {
                case AnybillErrorType.genericError: {
                    // Display error message
                }
                case AnybillErrorType.networkError: {
                    // Display error message
                }
                case AnybillErrorType.noUserError: {
                    // Display error message
                }
                ...
                default: {
                    // Display error message
                }
            }
        }
    }

    // Continue query with Continuation Token
    Future<void> _getNextPage() async {
        final continueReceiptsReq = await ReceiptProvider.instance.getReceipts(
            take: _receiptBatchSize,
            orderBy: UserReceiptOrderByFieldDto.Date,
            orderDirection: OrderByDirectionDto.Descending,
            continuationToken: continuationToken);

        if (continueReceiptsReq is Success<ContinuationReceiptList>) {
            continuationToken = continueReceiptsReq.data?.continuationToken;

            /// Access receipts via continueReceiptsReq.data?.receipts.data
            final List<ReceiptDto> nextReceipts =
                continueReceiptsReq.data?.receipts.data ?? [];
        }

        if (continueReceiptsReq is Failure<ContinuationReceiptList>) {
            switch (continueReceiptsReq.type) {
                case AnybillErrorType.genericError: {
                    // Display error message
                }
                case AnybillErrorType.networkError: {
                    // Display error message
                }
                case AnybillErrorType.noUserError: {
                    // Display error message
                }
                ...
                default: {
                    // Display error message
                }
            }
        }
}Optimized SDK Caching Process
The anybill SDK offers an optimized receipt pagination process with automatic caching, providing efficient querying and display of receipts. This feature stores receipts in a local database, allowing for quicker access and better performance. Receipt actions such as deletion, edits, or marking receipts as favorites are automatically updated in the cached receipt list, making it easy to integrate receipt-related features without manual updates to the displayed list.
To enable this, the ReceiptProvider exposes a Stream<List<ReceiptDto>> via getCachedReceiptsAsStream(), which represents a live, up-to-date view of the cached receipts. The initiateReceiptQuery() and continueReceiptQuery() methods allow you to refresh or extend the receipt list with new data as needed.
Similar to direct API access, you can customize the query with the following parameters:
- take: Specifies the number of receipts to retrieve in each batch, with a maximum of 100 by default.
- orderBy: Specifies the field for ordering receipts. Currently, only
Dateis supported. - orderDirection: Defines the sort direction for receipts, either
AscendingorDescending.
TIP
Note on Pagination and Sorting
The continuation token and query management are handled internally by the SDK, so there is no need for manual handling to load additional pages. However, you can check if further pages are available by evaluating whether ContinuationReceiptList.continuationToken == null.
If you wish to change the sorting or direction of the receipt list, use the initiateReceiptQuery() method again. This will reset the locally cached receipts and emit the updated list on the stream accordingly.
If continueReceiptQuery() is called without a preceding initiateReceiptQuery() or when no further pages are available, a Failure of type AnybillErrorType.noContinuationToken is returned.
Example implementation in a ViewModel:
Setup Stream
The getCachedReceiptsAsStream() provides a Stream, that automatically includes the cached receipts of previous queries. Without calling an API Call you can already display these receipts to quickly provide information to the end user.
dart
    List<ReceiptDto> _receipts = [];

    /// Initiate the receipts Stream in the initialize method of your view model
    void _observeReceiptsStream() async {
        await ReceiptProvider.instance.getCachedReceiptsAsStream().then(((stream) => {
          if (stream is Success<Stream<List<ReceiptDto>>>)
            {
              stream.data?.listen((newReceipts) {
                _receipts = newReceipts;
              })
            }
        }));
    }
Fetch first page / Update receipt list
The initiateReceiptQuery method resets any existing query and caches the newly fetched receipts in the local database. We recommend calling this method in the following scenarios to ensure an up-to-date receipt list:
Initial Display of Receipt List
When the receipt list is displayed for the first time in a session (e.g., when the user navigates to the receipt list view), this method should be called to display the latest receipt data. Note that this call is unnecessary after actions such as editing, deleting, or marking a receipt as favorite, as these are automatically handled within the SDK.New Receipt Received
If a new receipt is issued while the user is in the app, the list should be refreshed upon notification of the new receipt (e.g., triggered by a webhook event). This ensures the receipt list reflects the latest transactions.Manual User Update
For scenarios where a user manually refreshes the list, such as through a "pull-to-refresh" gesture or a refresh button, use this method to re-fetch the latest data for the first page.Change in Sort Order
When changing the sorting parameters of the receipt list (e.g., switching the sort order), call this method with the new parameters. This will reset the cache to reflect the updated sorting criteria.
WARNING
Cache Reset Consideration
As this method resets the cache and fills it with a new first page, any previously cached pages will be cleared and must be re-fetched. Avoid calling this method when navigating back to the receipt list from a single receipt view to prevent unnecessary reloading.
dart
      // Load Initial Receipts
        Future<void> _loadInitialReceipts() async {
            final initiateReceiptsReq = await ReceiptProvider.instance.initiateReceiptQuery(
                take: _receiptBatchSize,
                orderBy: UserReceiptOrderByFieldDto.Date,
                orderDirection: _sortAscending
                    ? OrderByDirectionDto.Ascending
                    : OrderByDirectionDto.Descending);

            if (initiateReceiptsReq is Failure<ContinuationReceiptList>) {
            switch (initiateReceiptsReq.type) {
                case AnybillErrorType.genericError:
                {
                    // Display error message
                }
                case AnybillErrorType.networkError:
                {
                    // Display error message
                }
                case AnybillErrorType.noUserError:
                {
                    // Display error message
                }
                default:
                {
                    // Display error message
                }
            }
            }
        }
Fetch next page
To retrieve the next batch of receipts in the existing query, use continueReceiptQuery(). This method automatically applies the previously retrieved continuation token to fetch the subsequent set of receipts, seamlessly updating both the cached receipt list and the associated stream.
dart
      // Load Next Receipts
        Future<void> _loadNextReceipts() async {
            final nextReceiptsReq =
                await ReceiptProvider.instance.continueReceiptQuery(take: _receiptBatchSize);

            if (nextReceiptsReq is Failure<ContinuationReceiptList>) {
            switch (nextReceiptsReq.type) {
                case AnybillErrorType.genericError:
                {
                    // Display error message
                }
                case AnybillErrorType.networkError:
                {
                    // Display error message
                }
                case AnybillErrorType.noUserError:
                {
                    // Display error message
                }
                default:
                {
                    // Display error message
                }
            }
            }
        }
Retrieving a single receipt
The ReceiptProvider.getReceiptById() method retrieves a single receipt by its identifier. Both parameters are positional:
- receiptId: Identifier of the desired receipt.
- useCache: If
true, the receipt is looked up in the local cache first and only fetched from the API if it is not cached. Iffalse, the API is always called.
dart
    Future<void> loadReceipt(String receiptId) async {
        final receiptResult = await ReceiptProvider.instance.getReceiptById(receiptId, true);

        if (receiptResult is Success<ReceiptDto?>) {
            final receipt = receiptResult.data;
            /// Display receipt
        } else if (receiptResult is Failure<ReceiptDto?>) {
            // Display error message
        }
}Marking Receipts
The anybill SDK provides following methods to edit or mark receipts:
Mark a receipt as favourite
Allowing to mark a receipt as favourite toggling the Receipt.Misc.isFavourite flag.
dart
    ReceiptDto? receipt;

    Future<void> toggleIsFav(String receiptId) async {
    final favouriteResult =
        await ReceiptProvider.instance.toggleIsFavourite(receiptId: receiptId);

    if (favouriteResult is Success<ReceiptDto>) {
      receipt = favouriteResult.data;
    }

    if (favouriteResult is Failure<ReceiptDto>) {
      switch (favouriteResult.type) {
        case AnybillErrorType.genericError:
          {
            // Display error message
          }
        case AnybillErrorType.networkError:
          {
            // Display error message
          }
        case AnybillErrorType.noUserError:
          {
            // Display error message
          }
        default:
          {
            // Display error message
          }
      }
    }
  }
Set custom note for receipt
Using the ReceiptProvider.updateReceiptNote() method, a custom note can be set for a receipt which can be retrieved in the Receipt.Misc.Note field. This field can later on be used for querying and filtering the receipt list.
dart
    ReceiptDto? receipt;

    Future<void> updateNote(String receiptId, String note) async {
        final noteResult = await ReceiptProvider.instance.updateReceiptNote(
            receiptId: receiptId, note: note);

        if (noteResult is Success<ReceiptDto>) {
        receipt = noteResult.data;
        }

        if (noteResult is Failure<ReceiptDto>) {
        switch (noteResult.type) {
            case AnybillErrorType.genericError:
            {
                // Display error message
            }
            case AnybillErrorType.networkError:
            {
                // Display error message
            }
            case AnybillErrorType.noUserError:
            {
                // Display error message
            }
            default:
            {
                // Display error message
            }
        }
    }
  }
TIP
When implementing with the Optimized Caching Process of the SDK, the receipt list does not have to be updated when editing the receipt. This is handled internally in the SDK.
Export as PDF
To ensure legally compliant receipts, the original receipt must be retrievable as a PDF file. The structured data provided by the anybill SDK does not represent the original receipt but serves to display relevant receipt information.
To access the original receipt, the anybill SDK offers the method ReceiptProvider.getReceiptPdf(), which returns a list of bytes that enables to either export it using the native share view or save it directly to the device via the file picker view.
Parameters for Customization:
isPrintedVersion:
Generates a multi-page DIN A4 PDF version of the receipt, making it easier for end users to print a physical copy of the receipt, such as for return processes that require paper receipts.
includeReturnReceipts:
Includes all return receipts linked in Receipt.Misc.ReceiptReferences within the generated PDF. Note that this option can significantly increase the duration of the API call, as multiple PDFs must be generated and merged.
dart
     Future<void> getReceiptPDF(String receiptId) async {
        final pdfResult = await ReceiptProvider.instance.getReceiptPdf(receiptId: receiptId);

        if (pdfResult is Success<List<int>>) {
            /// Generate pdf
        }

        if (pdfResult is Failure<List<int>>) {
        switch (pdfResult.type) {
            case AnybillErrorType.genericError:
            {
                // Display error message
            }
            case AnybillErrorType.networkError:
            {
                // Display error message
            }
            case AnybillErrorType.noUserError:
            {
                // Display error message
            }
            default:
            {
                // Display error message
            }
        }
    }
  }
Export multiple receipts
The ReceiptProvider.exportReceipts() method exports multiple receipts to a ZIP file and sends an email containing a link to the exported file to the user's email address. Anonymous users cannot use this function.
receiptIds:
Optional list of receipt IDs to export. If null (or empty), every receipt of the user is exported.
dart
    Future<void> exportReceipts(List<String>? receiptIds) async {
        final exportResult = await ReceiptProvider.instance.exportReceipts(receiptIds: receiptIds);

        if (exportResult is Success<void>) {
            /// Export requested, the user receives an email with the download link
        } else if (exportResult is Failure<void>) {
            // Display error message
        }
}Adding a receipt
Besides the app link flow, a receipt can be added to the account of the currently authenticated user directly via ReceiptProvider.addReceipt(), e.g. after scanning the QR code on an anybill receipt and parsing it with AnybillURLUtils.extractAnybillURLData(). On success, the data of the result contains the ID of the added receipt.
receiptId (required):
ID of the receipt that is supposed to be added.
isSelfGenerated:
Indicator if the ID of the receipt was self generated by the POS or not (default false).
vendorCustomerId:
ID of the vendor customer which issued the receipt.
dart
    Future<void> addReceipt(AnybillURLData urlData) async {
        final addResult = await ReceiptProvider.instance.addReceipt(
            receiptId: urlData.billId,
            isSelfGenerated: urlData.isSelfGenerated,
            vendorCustomerId: urlData.vendorCustomerId,
        );

        if (addResult is Success<String>) {
            final addedReceiptId = addResult.data;
            /// Refresh the receipt list, e.g. via initiateReceiptQuery()
        } else if (addResult is Failure<String>) {
            // Display error message
        }
}Deleting receipts
The anybill SDK provides functionality to delete either a single receipt or a batch of receipts. When deleting a single receipt with the optimized caching process, the receipt is automatically removed from the local cache, ensuring the observable data is kept up-to-date without requiring manual intervention.
Methods for Deleting Receipts
ReceiptProvider.deleteReceipt():
Deletes a single receipt from the user’s receipt list. This method can be used for operations where only one specific receipt needs to be removed.
ReceiptProvider.deleteReceipts():
Deletes multiple receipts (up to 100) from the user’s receipt list in a single operation. If an error occurs during the batch deletion process, a Failure of type AnybillErrorType.genericError is returned. The Failure object only contains the HTTP status code and message; it does not list which receipt IDs could not be deleted.
dart
    Future<void> deleteReceipts(List<String> receiptIds) async {
        final deleteResult = await ReceiptProvider.instance.deleteReceipts(receiptIds: receiptIds);

        if (deleteResult is Success<void>) {
            /// Receipts deleted
        } else if (deleteResult is Failure<void>) {
            // Display error message
        }
}Enroll payment cards
Prerequisites
To link a new payment card, the user must meet the following requirements:
- The user must be authenticated.
- The user must have an enrollable receipt associated with their account. A common flow for meeting these prerequisites involves the user being directed to your app from the receipt retrieval website via an app link, which adds a receipt to their account. Alternatively, a receipt can be added directly via
addReceipt().
Once these prerequisites are fulfilled, the Anybill SDK can be used to enroll new payment cards. There are two approaches to linking a payment card, detailed below. Both approaches expect the list of user receipts (List<ReceiptDto>) as positional parameter, so make sure to retrieve the receipts before calling them. If the given receipts contain no enrollable payment information, a Failure of type AnybillErrorType.noPaymentInformation is returned.
First approach
The first approach involves using the isCardEnrollmentAvailable method. This method returns a URI if an enrollable card is found. It is recommended to call this method whenever new user receipts are fetched or added.
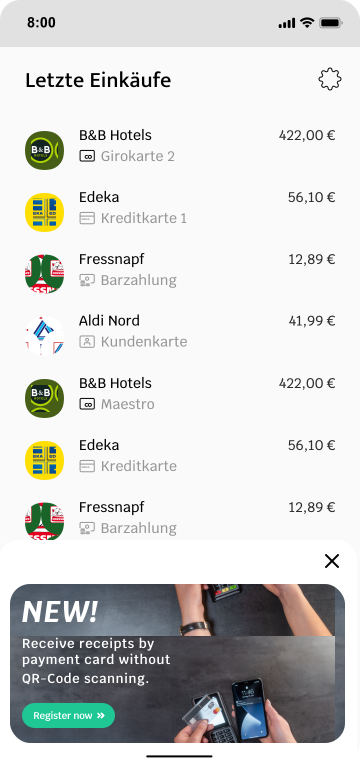
If an enrollable receipt is available, you can display a banner to the user, notifying them of the option to enroll a new payment card. This card enrollment allows them to receive future receipts automatically when using the enrolled card for payments.
The banner should redirect the user to the URI returned by the isCardEnrollmentAvailable method. When redirecting to this page, you must include authentication headers. These headers can be obtained using the CardEnrollmentUtils.getHeaders() method.
dart
    Future<void> openEnrollmentPage(List<ReceiptDto> receipts) async {

      final result = await ReceiptProvider.instance.isCardEnrollmentAvailable(receipts);

        if (result is Success<Uri?> && result.data != null) {
          final headers = await CardEnrollmentUtils.getHeaders();
              Navigator.push(
                context,
                MaterialPageRoute(
                  builder: (context) => WebViewScreen(
                    url: result.data!.toString(),
                    headers: headers,
                  ),
                ),
              );
        } else if (result is Failure<Uri?>) {
          switch (result.type) {
            case AnybillErrorType.genericError:
            {
                // Display error message
            }
            case AnybillErrorType.networkError:
            {
                // Display error message
            }
            case AnybillErrorType.noUserError:
            {
                // Display error message
            }
            default:
            {
                // Display error message
            }
        }
      }
    }

  /// This is just an example implementation.
  class WebViewScreen extends StatelessWidget {
  const WebViewScreen({required this.url, required this.headers});
  final String url;
  final Map<String, String> headers;

  @override
  Widget build(BuildContext context) {
    late final WebViewController controller;

    controller = WebViewController()
      ..setJavaScriptMode(JavaScriptMode.unrestricted)
      ..loadRequest(
        Uri.parse(url),
        headers: headers,
      );

    return Scaffold(
      appBar: AppBar(
        title: Text("WebView"),
      ),
      body: WebViewWidget(controller: controller),
    );
  }
}
TIP
Manage user cards
You can enable the user to manage his enrolled cards using the same flow. Just open the uri returned by CardEnrollmentUtils.getCardManagementUri(). Don't forget to send the headers used for authentication (CardEnrollmentUtils.getHeaders()).
Second approach
The second approach involves using the enrollCard method of the ReceiptProvider.
To retrieve information about enrollable payment cards, you can call the getEnrollablePaymentInformation method. This method returns a Map where the uniquePaymentIdentifier serves as the key and the receiptId as the value.
This approach requires you to design and implement a user interface that allows the user to input the last four digits of their payment card.
dart
    Future<void> getEnrollablePaymentInformation(List<ReceiptDto> receipts) async {

      final enrollablePaymentInfo = await ReceiptProvider.instance.getEnrollablePaymentInformation(receipts);

        if (enrollablePaymentInfo is Success<Map<String, String>> &&
          enrollablePaymentInfo.data != null) {
          for (final paymentInfoEntry in enrollablePaymentInfo.data!.entries) {
            /// Show receipt information (receiptId = paymentInfoEntry.value), so the user understands which payment card number is needed for the enrollment process.
          }
        } else {
          /// No enrollable card found
        }
    }

    Future<void> enrollPaymentCard(String lastDigits, String uniquePaymentIdentifier, String receiptId) async {

      final enrollDto = EnrollCardDto(
        billId: receiptId,
        uniquePaymentIdentifier: uniquePaymentIdentifier,
        last4Digits: lastDigits,
      );

      final result = await ReceiptProvider.instance.enrollCard(
        enrollCardDto: enrollDto,
      );


      if (result is Success<void>) {
        /// Successfully enrolled card
      } else if (result is Failure<void>) {
        switch (result.type) {
          case AnybillErrorType.genericError:
          {
              // Display error message
          }
          case AnybillErrorType.networkError:
          {
              // Display error message
          }
          case AnybillErrorType.noUserError:
          {
              // Display error message
          }
          default:
          {
              // Display error message
          }
      }
    }
  }
Manage payment cards
Retrieving enrolled payment cards
The getEnrolledCards() method of the ReceiptProvider allows to fetch a list of enrolled payment cards. Each card is represented by an EnrolledCardDto:
dart
class EnrolledCardDto {
  /// Id of the enrolled card.
  final String id;

  /// Identifier of the enrolled card.
  final String? identifier;

  /// Name of the enrolled card.
  final String? cardName;

  /// Last four digits of the card number.
  final String? lastDigits;

  /// Date of the enrollment
  final String createdAt;

  /// Id of the vendor customer
  final String vendorCustomerId;
}
dart
     Future<void> getEnrolledCards() async {
        final result = await ReceiptProvider.instance.getEnrolledCards();

        if (result is Success<List<EnrolledCardDto>>) {
          /// display enrolled cards
        } else if (result is Failure<List<EnrolledCardDto>>) {
        switch (result.type) {
            case AnybillErrorType.genericError:
            {
                // Display error message
            }
            case AnybillErrorType.networkError:
            {
                // Display error message
            }
            case AnybillErrorType.noUserError:
            {
                // Display error message
            }
            default:
            {
                // Display error message
            }
        }
    }
  }
Renaming enrolled payment cards
In order to better distinguish payment cards, the anybill SDK offers the option of naming cards.
dart
    Future<void> renameCard(String cardId, String cardName) async {
      final result = await ReceiptProvider.instance.updateCardName(
          cardId: cardId,
          cardName: cardName,
        );
        if (result is Success<EnrolledCardDto?>) {
          /// Success, `result.data` contains the updated card
        } else if (result is Failure<EnrolledCardDto?>) {
          switch (result.type) {
              case AnybillErrorType.genericError:
              {
                  // Display error message
              }
              case AnybillErrorType.networkError:
              {
                  // Display error message
              }
              case AnybillErrorType.noUserError:
              {
                  // Display error message
              }
              default:
              {
                  // Display error message
              }
          }
      }
  }
Unlink payment cards
The SDK provides the unlinkCard method, to remove a linked payment card.
dart
     Future<void> unlinkCard(String cardId) async {
        final result = await ReceiptProvider.instance.unlinkCard(cardId: cardId);


        if (result is Success<void>) {
          /// Success
        } else if (result is Failure<void>) {
        switch (result.type) {
            case AnybillErrorType.genericError:
            {
                // Display error message
            }
            case AnybillErrorType.networkError:
            {
                // Display error message
            }
            case AnybillErrorType.noUserError:
            {
                // Display error message
            }
            default:
            {
                // Display error message
            }
        }
    }
  }